

![]()
![]()
![]()
![]()
![]()
Macintosh Operating System Tutorial
MAC OS 8
You will need to be able to perform each of the steps below in order to complete the rest of the assignments this semester. Practice each operation until you feel comfortable with it. If you have trouble, ask for help.
START UP
Start the Mac by pressing the keyboard button marked with a triangle indentation in the
upper right corner of the keyboard.
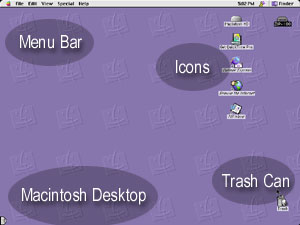 |
Macintosh Desktop |
SELECT AN OBJECT
Position the cursor over a Desktop object with the mouse and click it once to highlight
it.
DESELECT AN OBJECT
Position the cursor over a neutral area of the Desktop and click it once.
MOVE AN OBJECT (Click-and-Drag)
Click on an object to select it, but do not release the mouse button. While
holding down the button, slide the mouse to drag the object to the other side of the
screen. When the object reaches the desired location, release the button.
OPEN A WINDOW
Choose an object on the desktop, in this case the Macintosh HD (hard drive) and
double-click on it. Notice that the Status Bar reports the number of items and how much
storage space is free.
MOVE A WINDOW
Click-and-drag the Title Bar of the window to move the entire window around on
the screen.
RESIZE A WINDOW
Click-and-drag the Size Box on the right lower corner of the window to show more
or less information in the window at one time.
SCROLL A WINDOW
Click-and-drag the Scroll Box in the vertical and horizontal Scroll Bars to view
the window’s contents.
EXPAND OR CONTRACT A WINDOW
Use the Zoom button (the inside one on the right side of the Title Bar) to make
the window larger or smaller.
MAKE A WINDOW INACTIVE
Here are two ways to keep a window ready for use but out of the way.
To make a window Inactive, click-and-drag the Title Bar off the lower edge of the screen. The window will be reduced to a tab at the edge of the screen. To see the window again, click the tab. The window will pop open with the tab still attached. Click the tab again and it will become inactive again. Click and drag the tab up into the center of the desktop and the window returns to normal.
The Windowshade feature also reduces the size of a window. Click the Windowshade button at the far right side of the Title Bar. The window will be reduced to just the Title Bar on the screen. Click the Windowshade button again and the window will pop open.
CLOSE A WINDOW
Click on the Close button at the upper left of the window.
OPEN A PORTABLE STORAGE DISK
Insert a CD into the CD drive. The computer will read the disk and place a disk
icon on the desktop. Double-click on the CD icon to review the contents of the CD.
EXAMINE FILES
With the CD window open, double-click on a folder to see the files it contains.
Click the Close button on the Title Bar of each window to close it.
BROWSE THROUGH FOLDERS
Use this technique to find files you need. Open the Macintosh HD window. Click
View on the menu bar and select As List. Use the Size Box to make the window large. Click
the Applications folder to make it active. Click the Expand Folder Icon, which is a small
triangle to the left of the folder icon and name. It will "twirl" down to show
all the subfolders and files in the folder. Find the Adobe Premiere file. This is the
software application we will use to edit video and audio.
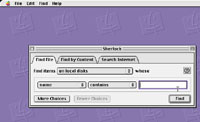 |
USE FIND FILE Use this technique to find files you need. Click the File button on the Menu Bar and select Find. Type adobe in the text box. Click the Find button. |
| The computer will list all the files it can find with the word adobe in the title. Find Adobe Premiere in the list and double-click its icon to open the program. Click the Close button on the title bar to close the program. Close the rest of the windows on the screen. | |
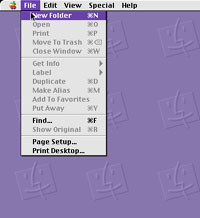 |
CREATE AND NAME A FOLDER ON THE HARD DRIVE Open the Macintosh HD window. Click File on the Menu Bar and select New Folder. Type the letter A and your last name.
|
| CREATE AND NAME A FOLDER ON THE
DESKTOP Click anywhere on the Desktop. Click File on the Menu Bar and select New Folder. Type the letter B and your last name. |
|
RENAME A FILE OR FOLDER
Click on the folder you just created. Click on the folder name and pause a
moment. The folder name will be highlighted. Type your first name. The folder will now
have the new name.
COPYING FILES TO NEW LOCATIONS
For the rest of the semester, you will bring your data CD to class, copy files
from the CD onto the hard drive of the computer you are using, work with the files in the
computer, and then copy your finished project onto a Zip disk for grading.
Make sure the Macintosh HD window is open on your screen. Resize the window to make it smaller on the screen. Scroll through it until you can see the personal file you created.
Double-click on the CD icon to open it. Find a file that is smaller than 10 MB.
Click-and-drag the file you have chosen over to your personal file on the HD window. When you see the name of your personal file become highlighted, release the mouse button. The computer will copy the selected file from the CD to the hard drive.
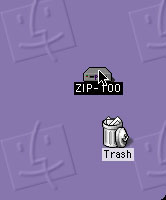
Insert your Zip disk in the Zip drive. The computer will read the disk and install a new icon for it on the Desktop.
Click-and-drag your personal file from the hard drive window to the Zip disk icon. When the Zip disk icon becomes highlighted, release the mouse button. The computer will copy your personal folder and its contents to the Zip disk.
Close all the windows on the screen. Then double-click on the Zip disk to view its contents.
DELETING FILES AND FOLDERS
At the end of every lab session, you should copy your work to your Zip disk in
order to save it for continued work later or to hand it in for grading.
Then you must go back to the hard drive and delete all of your personal files to make room for the next person who will use the computer.
Remove any personal files from the Desktop by click-and-dragging the file to the Trash icon. When the Trash icon becomes highlighted, release the mouse button. This places your personal files in the Trash folder.
Remove any personal files from the hard drive by opening the Macintosh HD window, finding your personal files, and dragging them to the Trash icon. Then close the hard drive window and any other open windows on the screen.
On the Menu Bar, click on Special and select Empty Trash. You will get a cautionary dialog box asking if you want to remove the items permanently. If you have already copied your work to your Zip disk, click on OK. All the items in the Trash folder will be deleted permanently from the hard drive. This will include the hard drive and desktop copies of your personal folders as well as other material placed in the Trash folder by previous users of that computer. Close the Trash folder.
 |
REMOVING DISKS FROM DRIVES To remove your Zip disk and CD from their drives, click-and-drag the icon for each disk to the Trash icon. This will not delete any files you have on these disks. It will cause each disk drive to eject its disk. Remove your disks and store them immediately in their protective cases, which should be labeled with your name. |
| CLOSING APPLICATIONS You should close any application program you have worked with during class. To do this, click on the Finder Icon (square smiley face) on the right side of the Menu Bar. Select the application from the drop-down menu. |
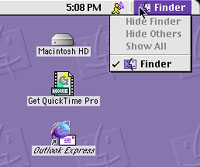 |
| Quit the application in one of two ways: Select File on the Menu Bar and select Quit from the File menu, or hold down the daisy key on the keyboard and type the letter "Q." Repeat this process until all the applications except the Finder are closed. | |
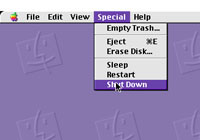
| SHUT DOWN Select the Desktop by clicking on it. Select Special on the Menu Bar. Select Shut Down from the Special menu. ALWAYS shut down a Macintosh computer in this manner. |
 |
|
| HELP You will always find the Help menu as the last item on the Menu Bar, whether you are working within an application program or on the Desktop. There is extensive help about OS 8 built into the system. Access it this way: Select the Desktop by clicking on it. Select Help on the Menu Bar. Select Help from the Help menu. When you are working within an application program, OS 8 Help will be replaced by Help specific to that application. Some applications have better Help sections than others. |
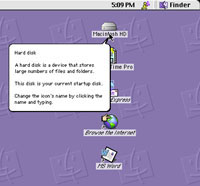
| BALLOON HELP This feature give you instant hints about objects and buttons on the screen. To access Balloon Help, click the Help menu and select Show Balloons. Now, when you position the cursor over objects on the screen, a balloon of information will appear. To switch this function off, click on the Help menu and select Hide Balloons. |
 |
Home Page | Assignments | Syllabus | Instructor | JMC Web Site