

![]()
![]()
![]()
![]()
![]()
by Jim Stinson
This article originally appeared in
Videomaker Magazine on 01-Feb-98
(C)1998 Videomaker Magazine. Reproduction for uses other than personal is prohibited.
Create a video program by adding, sequencing and enhancing your camcorder footage.
A long time ago in a war far, far away, my future father in law came home from the South Pacific with a stash of mahogany sticks cut two feet long to fit in his sea bag. Within a year a master furniture maker had glued up, cut, shaped, finished, and polished that rough wood into an elegant Queen Anne table.
If my father in law had simply needed a place to prop a beer can, he could have just stacked the raw wood. But though a pile of sticks may offer a surface of sorts, it's emphatically not a table.
In exactly the same way, camcorder footage may be audiovisual material, but it's emphatically not a program. Like the mahogany, it too must first be cut, shaped and polished. It must be edited.
Note that the wood didn't start out as a "crude" table or an "amateur" table or a "long and boring" table whose shape was merely improved by the furniture maker. Before he got his expert hands on it, it wasn't a table at all, but simply a jumble of sticks. To create the table he had to transform his raw material into something completely different.
The same is true of video. The simplest form of video editing is simply cutting out the dull parts and goof-ups, but true editing does not stop there. It includes adding, sequencing, and enhancing many small pieces of the video footage to create a completely different animal called a video program.
The Right Additives
Tyro videographers think they're editing when they cut out shots that are shaky, out of
focus, repetitive, or just dorky. You might call this method subtractive editing: take
away the bad stuff and what's left is the program.
Though better than no editing at all, subtractive editing can rarely do more than shorten the ordeal of watching the result.
Genuine video editing is not subtractive, but additive. Starting with nothing, you purposefully select and place one shot after another until they add up to a program. Notice that you don't select what to take out but what to put in.
To illustrate, imagine a video called Skiing at Mount Cattiwompus, in which your wife cheers from the lodge, your daughter shows off on the beginner slope, and you record her ballet for posterity, or at least for Grandma in Florida.
If you're a subtractive editor, Grandma gets most of the footage, except maybe where snow splattered on the lens, where a direct shot of the sun flared the image out to blinding white, and where you fell over a pile of snowboards with the camcorder. The result: heeeere's Susie, zigzagging back and forth and back and forth and back and forth across the slope in a numbing repetition brightened only by brief interludes of windmilling into the powder.
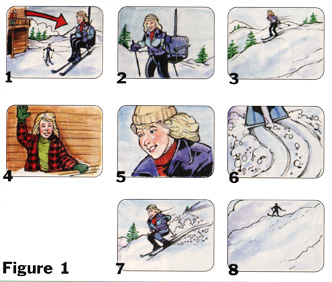
But if you practice additive editing your video might resemble this partial shot list
- Establishing shot, panning from wife at the lodge balcony to Susie on the chairlift.
- Closeup of Susie getting off the chairlift.
- Telephoto full shot of Susie pushing off down the slope.
- Wife proudly waving at Susie.
- Tight closeup of Susie's eager face.
- Tight-curving wake of the skis.
- Wide shot of Susie hotdogging confidently across the slope.
- Extreme long shot from bottom of slope.
Hold it! How did you suddenly get to the bottom of the slope--did you beam down or something? No, you used a shot made on an earlier run when your wife and daughter went down by themselves. In fact, the edited program condenses a whole afternoon of skiing into a single five-minute sequence, using the best raw material from several separate runs made at different times.
Clearly, you can't do this by just subtracting the bad shots. Instead, you have to bring together shots that are not only good but also appropriate: the right shot in the right place. That is additive editing.
Select Sequences
But what is the "right shot" and what is the "right place?" That's
what sequencing is about. Sequencing is the art of arranging successive shots to create
continuity, appropriateness and variety.
To see how this works, take another look at the storyboard. Notice that it begins with an establishing shot: a broad view that swings around to encompass the entire scene. This orients the viewer right from the start. The next shot shows Susie getting off the chairlift because her descent is the next event in the sequence. The camera angle is a closeup because you can't see her clearly in a wider shot. The third piece of this mosaic is another shot of Susie because her action (skiing down the slope) will directly follow the action shown in the previous angle. It's a full shot (head to toe) because that's as close as you can get while still showing Susie's whole body as she performs her maneuver.
To determine what is the right shot in the right place, ask three key questions:
- What happens next?
- What is the most appropriate (revealing/interesting) view of it?
- How will this new view (camera angle) differ significantly from the one just before it?
In addition to selecting the right shot at the right place, sequencing can synthesize action that didn't happen in actuality. Suppose you wanted to dramatize Susie's narrow escape from a collision with another skier without really doing anything unsafe. Here's how you might do it.
- Full shot: Susie skiing down the slope.
- Closeup: Susie's face showing surprise and fright.
- Susie's point of view of a skier rushing toward her.
- Closeup of wife's surprised face.
- Skier turning aside just in time.
- Closeup: Susie looking relieved.
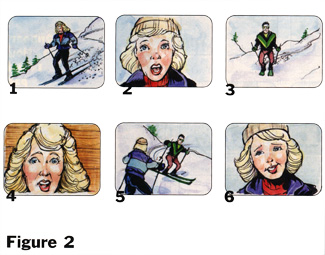
How did you get these shots? Easy: the closeups of Susie looking fearful and then relieved were lifted from another shot entirely in which she almost falls, but recovers. The shot of her skiing down the slope is a second dub of the one used earlier . The only shots made for the sequence are the wife's surprised reaction and the hotdog skier, which were easily taped from the lodge and the side of the slope.
See? By sequencing six shots that originally had nothing to do with Susie avoiding a collision, you can synthesize an incident that exists only in your program.
Additive editing and shot sequencing are easier if you've shot the original footage with this approach in mind--that is, if you've provided all the components required to build a program up from scratch. This is called shooting to edit and we'll have more to say about the process in future columns.
Enhancing the Mix
If you practice additive editing and sequence your selections carefully, you'll have a
very good sequence of selections. What you won't yet have is a program. To finish the job
you need to integrate all your separate ingredients to create the appearance of a smooth,
coherent video. In addition to titles and similar trimmings, this process of enhancement
means fusing the video pieces and blending the audio.
You fuse two video shots together by concealing the edit between them so that the result looks like a single action uninterrupted by a cut. For transitions between sequences, you select digital effects like fades, dissolves, wipes and flips (and we'll have more to say about choosing these in future excursions).
Within each sequence you conceal the jump from one shot to the next by matching the action and changing the camera angle. If you don't match the action and change the camera angle between shots, you'll end up with either a lack of visual continuity or a jump cut--a shot where the action seems to take a confusing little jump in time from one shot to the next.
To match action, you can start the incoming shot exactly where the action was at the end of the previous shot or you can drop back and punt by letting the action end off screen (outgoing) or else start off screen (incoming) so the viewer can't see whether it matches or not. (An alternate trick is to interrupt the action with a cutaway shot of something different in between.)
The art of varying the camera setup is a whole topic in itself. Briefly, in changing from one view to the next you have three aspects to vary: image size (long shot, closeup, etc.), horizontal angle (front view, profile), and vertical angle (high, neutral, low, worm's eye). To conceal the shift between camera setups, be sure to change your point of view on at least two aspects out of three.
After fusing the video comes blending the audio, and the idea here is to provide an aural continuity that strengthens the flow of the work. Music is important, of course, but too many people neglect production sound. How often have you been frustrated by audio quality that changes obviously from shot to shot?
Until recently, there wasn't much you could do with prosumer-level video sound, but as digital post production grows ever more powerful and affordable, multi-layer audio becomes practical. That means you can adjust volume levels from shot to shot and homogenize the ambient audio quality with a through-track of background sound. The result: sound that flows across edits and delivers the feeling of one long, continuous presentation.
If this discussion sounds superficial, don't fret. We'll explore these ideas more fully in future columns. For now it's enough to emphasize that true video editing is not chipping away at the marble until a statue emerges. Its bending an armature and then adding clay to it until the raw materials are transformed into a sculpture.
Click here for the next basic editing article
This article originally
appeared in
Videomaker Magazine February 1998.
Reprinted with permission from
Videomaker Magazine, Chico CA. Videomaker, Inc. All Rights Reserved.
Home Page | Assignments | Syllabus | Instructor | JMC Web Site