Introduction
The purpose of this lab exercise is to practice with classes. To make the program more interesting graphics will be used. In order to write a program that uses graphics you must have access to a graphics library. An educational graphics library is available for Visual Studio, an IDE (Intergrated Development Environment) software application for software development. Many languages are supported in such environment. C++ is one of them. Therefore, the next program you will write will be created in Visual Studo and ran on your local machine instead of loki.
First things, first.
Let's become familiar with the graphics and the Visual Studio environment. An educational Graphics library, called EZwindows, has been chosen for this purpose.
In this part of the lab you will get acquainted to Visual Studio, you will take an existing code and you will modify it to improve it. In the post_lab you will write your brand new code. Before we start working with Visual Studio, download the Lab12Material on your machine. The folder contains contains the Lawn.cpp file that you will modify later and the folder EzwinvcFiles which contains the library Ezwinvc50.lib together all the *.h files that will be necessary for this lab. Unzip the file and keep track of the path where you have saved the folder.
Visual Studio
//this program is a test #includeusing namespace std; int main() { cout << "Hello!" << endl; system("Pause"); return 0; }
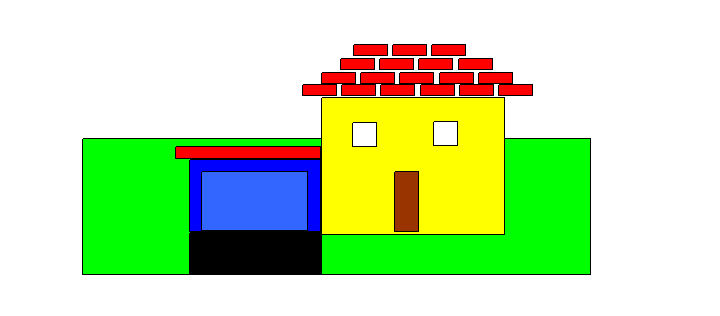
Your project is finally ready to run. Lawn.cpp contains a program that computes the cost of mowing a lawn. The cost depends on the size of the lawn, the size of the house and the size of the garage. The program prints the cost of mowing the lawn and draws a green lawn, a house and a garage. The lawn, the house and the garage are in different colors and are depicted as simple rectangles.
If the code is running correctly, the consol window is open and the program asks to enter the size of a lawn, of a house, and of a garage. Run the code by using these testing values:
length of the lawn: 600
width of the lawn: 600
length of the house: 300
width of the house: 300
length of the garage: 150
width of the garage: 100
The display window will open that draws the lawn, the house and the garage. Move the display window if it covers the console window so that you can read the resulting cost of mowing the lawn. How much does it cost to cut this lawn?
Now go back to the code of Lawn.cpp and start studying the code carefully and be sure you understand it well. The code is well commented. In order to follow the code, insert all the files *.h that are called. For example, Lawn.ccp includes rect.h, but rect.h includes shape.h and shape.h includes etc... For simplicity, if you prefer, you can include all the *.h files you have. You do not need to read in detail every *.h file but you need to understand the code in Lawn.cpp. For exampe, the class SimpleWindow used in the Lawn.cpp is defined in the file ezwin.h. The statement SimpleWindow Display("Lawn and House Plot", DisplayLength, DisplayHeight); creates an object called Display of the class SimpleWindow, which is the class that creates a display window. The name in the top corner of the window is in double quotes, the length and the width of the display window are given by the parameters DisplayLength, DisplayHeight. To open a display window you must call the method Open() in this way: Display.Open();. An object of the class SimpleWindow is used in the constructor of the RectangleShape class (the class of rectangles defined in rect.h).
When you feel familiar with the Lawn.cpp code you can start performing some modifications of the program by following the instructions below. Perform one step at a time and check periodically that your program keeps working appropriately.
Open the rect.h file and look at the code that describes the class RectangleShape, the class of all the rectangles. Call the file ex122.txt. List all the member functions of the class and for each function describe in one line its functionality. Do not be concerned when you see some arguments in the argument list of the methods that are preceded by the symbol &. This means that the argument preceded by the & symbol is passed by "reference". What it means is that instead of passing the value of the variable, we are passing the address where the value of the variable is. In other words we are telling where to get the value of the variable that the method needs instead of giving directly the value. However if the method changes that variable, the value of the variable will be changed in the original location and the change will be visible when the function is terminated. I know that we have not studied this yet, but we will do that soon. In the meanwhile, it is not necessary that you understand everything at the moment. It is important that you look at the names of the methods (since you may want to use them), not at the way they are implemented. That is the good thing of the OO programming...we have separation of concerns!!
Write a small paragraph in plain english that describes the code of Lawn.cpp. Note that in order to create a graphical program you must use the ApiMain( ) function instead of the main( ) function. Insert it as a comment in the file Lawn.cpp. Save the file as ex123.cpp.
Modifications to the Lawn
You are ready to make modification to the current Lawn.cpp file. If you make modification directly in to the file you have inserted in your project you will modify the original copy. So you may want to make a copy of the original file in YourNameLawn.cpp before you start any modification.
Start a new project (in the same way you did above) and call it YourNameLawnProject. Add to the current project the file YourNameLawn.cpp. Include the *.h files in the same way you just did and be ready to modify the code. Remember that Lawn.cpp program includes the rect.h file. In the modification you will perform, you may want to use other .h files that are available in the library folder. Therefore be ready to add any .h file that you need to include in your project. The .h files must be added to Header Files Folder. You also will need to use the library that is the Ezwinvc.zip file. All the .h files and the Ezwinvc50.lib library object file are in the folder EzwinvcFiles. Your project will not run if you do not set the path for the inclusion of the *.h files as well as for the library (unless all the .h files and the object file of the library is in the same folder of the project you have created.
For full credit be sure you follow accurately the specifications of this problem. Undesired changes of file names, of color, of measure or of other details that are requested, will be cause of points detraction. Call the program ex124.cpp.