 Tutorial for Oracle9i Designer
What is Oracle9i Designer
Oracle9i Designer is an integrated CASE tool that supports a wide range of
tasks in the area of strategy, analysis, design and code generation. It helps
users design the Systems Development Life Cycle and then generate full functioning
forms and reports (Dorsey and Koletzke, 1997). Like most other CASE tools, Designer
also has a repository or a central storage place where much of the information
pertaining to systems projects are stored in an integrated fashion. Designer
has many components, each of which helps in a particular phase of the SDLC.
Lesson 1
In this lesson, you will learn how to log on to Oracle Designer and create
a new application system
Starting with Log-On:
- In order to use the Designer tools, you must first start the database. The
database that you will use is called SA. This database has
already been setup on the server goobs.bsa.kent.edu. Your
instructor will have this database up and running.
- To access Oracle9i Designer, do the following
- Click on Start, Programs, Oracle9i Developer Suite, Oracle9i Designer,
Oracle Designer
-
A connection dialog box will appear (see Figure 1.1). Type
in your username, password and connect string to get
connected. Your username and password are ones that you specified for your
group. The connect string is SA. If you accessing
Oracle Designer from the labs in room 230 BSA, then the connect string should
already be there.
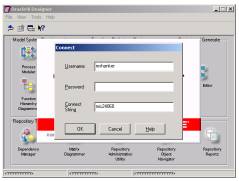 Figure 1.1. The Oracle9i Designer connect screen
- The Designer launchpad will appear. Click on the Repository Object
Navigator icon (on your lower right corner) to go to the Repository
Object Navigator. It is the Navigator Window where you will create the new
application. (See Figure 1.2).
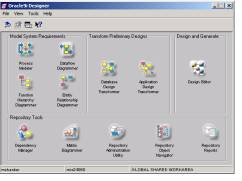
Figure 1.2: The Oracle9i Designer launchpad
- In the Repository Object Navigator Window, you will first create space for
your applications. To do this, select the Global Shared Workspace,
and then click on the small icon with a green +
sign in the vertical toolbar on the left hand side of your screen (when you
put the cursor over it, you will get a ballon saying create as child).
You will then get a menu to Select Type. Choose Application Systems
and hit OK.

Figure 1.3: The Repository Object Navigator(RON). Screen
- In order to name the Application, go to the Application System Properties
and name it (Here, we will name it as STUDENT). You will notice that while
you type, the name appears on the Object Hierarchy Window also. (See Figure
1.4).
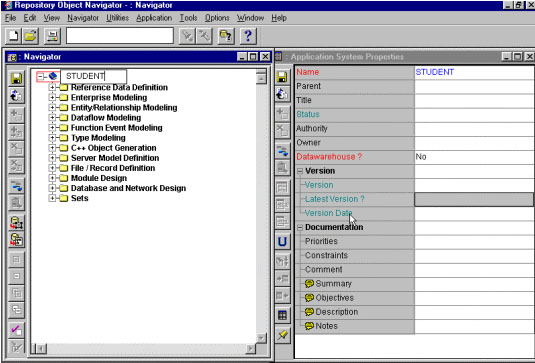
Figure 1.4: The RON Screen with the new application
- After you have finished naming it, click on the diskette icon on the top
left of the Application Systems Properties window to save it.
Lesson Summary:
In this lesson you have learned how to:
- Log on to Oracle9i Designer
- Create a new application